The People Who Lift Me Up

Oct 26, 2010

Cough Cough Sputter Sputter, I have something to tell you...

Oh I really do have to admit this was not the picture I was hoping to post for you on this very early Tuesday morning. No indeed it was not.
Alas, my dear friends, I have caught the flu. My son was home all of last week sick and now the nasty little virus, that I do imagine in my mind looks much like the above picture, has decided to park it's nasty little self my system for a bit.

I am happy to say I am feeling a bit better though and am in high hopes to be back in the game before the end of this week.
While I have not worked on my Christmas boy during this icky spell, I have been able to tinker on my laptop which gave me a chance to create the new graphic for my Funkie Punkie line.

What is a Funkie Punkie? Oh I am excited to tell you! My Funkie Punkie line will consist of 1980's inspired dolls. How groovy can ya get? Hmm groovy, perhaps that word is dating a bit back before the 80's? Anyhow, you will see anything inspired from the funkie and fantastic long hair bands to the bright and colorful punk movement. I can so see a Boy George inspired doll popping out of this line, oh yes sireeeeeeeeeee! The possibilities are going to be endless and having grown up in the 80's, well lets just say this line will be special to my heart and a true treat for me to create!

I will tell you a little secret, the very first doll from this line is being created for a loved one and lets just say keep the word head banger in mind! Are you as excited as I am?
Sending my love, warmest wishes, and a non-contagious achooooooooooo your way!


Oct 19, 2010

Questions, questions, questions, and Answers!

I love getting emails from you and I've had a lot of emails over this last year asking me how I make my dolls. I've been asked what supplies I use, what my steps to making a doll are, how long it takes etc. I've also been asked if I sell my patterns, teach classes, or give sculpting lessons. I thought it would be nice to answer all these questions via a blog post even though I have already answered back through email.

I guess I'll start with some of the supplies I use. I use a ton of various supplies and mediums so I am just going to list the ones I use every time I sculpt and are a MUST have for me.

1. Piecemakers 5 inch sculpting needles...I have used this brand for years and LOVE them!

2. Cluster stuff...I started using this for my heads while experimenting and it is fabulous to sculpt. It's a bit of a pain to stuff until you hit a groove but I will not use anything else for my heads. For my bodies I use any good quality polyfill type stuffing.

3. Stuffing fork...awesome for stuffing fingers and hard to reach places.

4. Derwent water color pencils.

5. Curved needles...Fantastic for sculpting noses and I will not use anything else.

6. Mettler thread...all I will use for sewing my bodies.

7. Coats and Clark carpet thread...the only thread I use for sculpting.

8. Prismacolor portrait pencil set.

9. Acrylic paints, diff brands.

10. Gesso...I use clear, black, and white.

11. Fabric...I use windsor comfort, doe suede, craft velour, and muslin.

                               
So what steps go into making a Ree doll? Well first comes the pattern. This is a lot of trial and error and can really get nutty at times. Once I finally get the pattern how I want it, I am ready to start making a doll. The pattern gets put onto fabric, cut out, then the sewing begins. I normally sew the head first. After that I stuff it. Next I start the sculpting process. Once I get the features the way I want them I paint the eyes, eyebrows, and mouth. Next comes the shading and details. Once I am done with all that I then do the hair. The head and hair always take me the longest and I am very tedious when it comes to those processes. I then sit the head aside and sew up the body. Stuffing comes next and then I start the sculpting process on the body. Once that is done shading and detailing come next. I then either sew an outfit for the doll or I put a cute store bought outfit on. The whole process takes me approx. 13-15 hours per doll. Start to finish I am the only one who touches the dolls but once I have my hired help next year it will change things a bit allowing me to create more dolls each week. My help will just be sewing and stuffing bodies, as I will always do the artistic work on all of my creations, but this will be a tremendous help and will really help me meet my demand. I am really excited.

Will I be teaching classes or selling my patterns? Right now I am having a hard enough time just keeping up with my sculpting so I do not think I will be doing either of these things anytime soon. I am not sure they will even be in my future but I always keep an open mind. I do try and post tips and such via here and my website though and I am always happy to help with questions if I can. I have tutorials on my website as well. There are FANTASTIC classes listed on CDA website http://clothdolls.ning.com/ as well as The Doll Net website http://www.thedollnet.com/. I have taken classes from both these sights over this past year, and let me tell you, you will not regret it. They are fabulous! If you are looking into making dolls or even if you are like me and have made dolls for a while these classes are a must and so fun.

I guess that just about covers the fun for now. As always it's been a true blessing sharing my doll making with you!


Oct 15, 2010

Que Tae or what? You tell me!

UPDATE: Que has sold!

Oh what fun I had with this darling girl. She is such a cutie or should I say Que Tae? Needless to say I am extremely please with how she turned out. I am just as tickled about her outfit.


I've had a lot of requests come in for straight weighted arms and weighted bottoms so I decided to give both a go on this darling and oh how fun she is to pose! She also has my standard jointed head.

Que loves to watch cartoons, eat rice crispy treats, and loves to color. She does NOT stay in the lines but we love it that way.

Que is availble on my website http://tipsyteacup.com/For%20Sale.htm


Oct 13, 2010

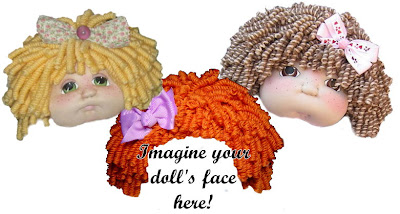
Wouldn't you like to make these curls?

I call these pencil curls, even though they are made with dowels and not pencils. I suppose you could make them with pencils if you truly wanted to but I do think dowels are the more practical choice lol.
I posted this procedure to make curls last year some time but while re-doing my blog the first time I wiped out quite a few posts, the pencil curl post being one of them, and I thought it would be nice to re-post the tutorial.

There are many successful ways to make curls, this is just the method which I developed that works best for me with the longest lasting results. Back when I figured out how to do these curls I didn't know about the online doll making clubs nor did I have any patterns that would teach me. I desperately wanted to learn how to make yarn curls without using the method of crocheting so my trial and errors began.
Now, I will tell you that I did know one person who did not make dolls but did hair makeovers on them whom figured out how to make this style of curl before I did (as I am sure many others in the doll world had as well) but she would not give her secret and I fully respected that, besides it made me work hard to understand how the whole process worked which in my thoughts contributed to my road to becoming a better doll maker.

Okay so enough of the jibber jabber.

What you will need:

*Two skeins of acrylic yarn (I prefer RedHeart for this) You can use two of the same color or two different colors. I have pictured examples of both.

*A large amount of dowels, 1/4 inch or smaller in width (too large will result in loose curls) and approx. 12 inches in length. I buy my dowels in 3ft lengths at Wal-Mart then snip them down to 12 inch pieces. If you want to use the larger 1/4 inch size you can buy bags of dowels at Wal-Mart in the wedding cake section already cut in 12inch lengths.

*A large GLASS baking dish

*Scissors

*Oven

*Oven Mitts

*Timer (or something to watch the time on)

*** Lots of patience and free time while watching TV (this is for the winding, unwinding, and cutting)

This is a super easy process BUT it does take a lot of time if you are wanting to do a nice full head of hair. I would say that the two sweet faces I pictured above took around 180 wrapped dowels or more. Yikes, a lot but so worth it! I bake 60 dowels at a time so that the heat spreads evenly.

Lets get started:

Get your yarn pulled out and tie the end of the two strands onto the end of the dowel then start to wrap the yarn tightly around the dowel pushing up as you go and making sure not to twist your strands. You want to tightly wrap as much yarn as possible on the dowel but make sure to never overlap the yarn. It needs to stay single layer. Once you are at the end of the dowel snip the yarn away from the skein and then tie off the yarn on the dowel and sit it into the baking dish.

Do the above step to the next 59 dowels (or however many you choose to make each round)

Next preheat your oven to 325. Actually ovens and such vary so it may be anywhere between 275-325. You do not want it too hot or it will discolor the yarn but too low will not give a strong enough curl. Put your dowels in the glass baking dish and bake for 45-60 minutes. Pop on your oven mitts and take the dish out of the oven and let the curls cool off. Do not touch them or the dish until all is cool. This may take a good while.

Once the curls are completely cool to the touch it's time to unwind them off the dowels. Pull them all off and then you are ready to cut them into the length you would like. For the all over curls I usually cut my curls into threes. Play around with lengths though, it's such fun!

Once you get all the curls cut and ready you can sew them onto your dolls head and make any style your imagination can come up with. This is a long process but not a hard one and it's so worth it in the end!

While this recipe may not make your tummy happy it's sure to be candy to the eyes once you see it on one of your dollies!


Oct 7, 2010

As slow as a turtle walking a snail???

Oh my, now could this truly be me?

Yes, yes, I do believe it is! Not really mind you, but I have to admit that I feel as though it is me much of the time.

I am so sorry to have not been keeping up with my blog posts but please rest assure that you have not been far from my mind or heart.

What have I been up to?
Well for one, I went out of town with my husband for a week while he worked. It wasn't the best town to visit, to tell you true, but I so enjoyed seeing his face after work each day and it was a pleasure to cook dinner for his crew. Those electric skillets rock! There were a lot of laughs and I did learn something important from the experience...I now know what town I NEVER want to live in LOL.

Now that I am back home I am excitedly back to work on my latest doll. She is a full size Asian Uht Oh and I have the most darling outfit for her. I cannot wait to share her with you and she should make her appearance sometime next week. After that, work on a little boy will begin along with a Gothic Giggle or two. I know many have been waiting on the Baby Giants and I do promise you I will get back to work on them soon. I had worked on so many of them after the first one was "discovered" in the forest of RaRa in the Yadish region that I got way behind with my other darling lovelies. I shall get it balanced out soon!
Warm happy fall hugs from me to you!